How to Create a Hardened Cloudflare Account
- Zack Glick

- Apr 22, 2024
- 8 min read
Zatik Security moved all of our domains and DNS infrastructure onto the Cloudflare platform in early 2024. We made this decision after completing a review of 5 commonly used domain registrars security features. We selected the Cloudflare platform based on the security features available on their intro tier without requiring an upgrade to the enterprise tier. These features are strong two factor authentication, support for multiple users with role-based access controls, in-account audit trails, and the ability to log out other users. Support for these features is included in the intro tier, but still needs to be configured. Follow along below as we create and harden a Cloudflare account in April 2024. If you just want the step by step without the narrative you can skip right there.Root Account Creation
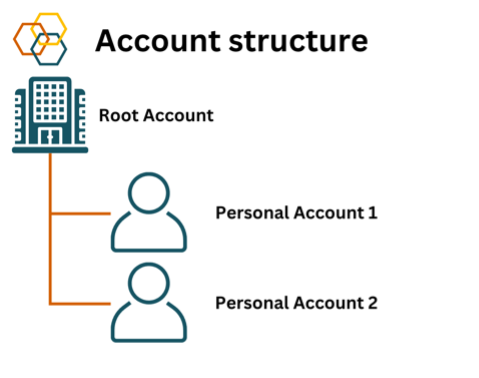
The setup for Zatik Security on Cloudflare is a root account which will be the parent of all other accounts. This root account will only be used during the creation and setup of the account. You should never use the root account as your day-to-day account. Any staff who need access to Cloudflare will log in with child accounts which are invited to the root account. Their invitations are scoped to only have the minimum permissions required to complete their tasks. For example, a member of the finance team could have an account which is only able to manage payment in Cloudflare but not alter any technical settings. Or a contractor hired to work on a marketing website can be granted access to manage the DNS records of that website only.
Since employees have their own accounts for day-to-day activities you can lock down access to the root account to a very limited number of individuals at your company. Reducing the use of this account and increasing friction at login will reduce the probability that the account will be compromised. The root account is reserved for a “break glass” scenario where a child account with administrative privileges is compromised and an attacker uses this elevated privilege to revoke all other access to the account. Since this attacker-controlled account is a child of the root account, it cannot revoke the root account’s access. You can then use the root account to remove the attacker-controlled account from your Cloudflare account, thereby containing the attack.
Here’s how we set up our accounts on Cloudflare: First, create an email address that is not associated with a specific user at your company, such as, admin@example.com. Use this email address to create a new account at Cloudflare. Store the password in the password manager that your company makes use of.
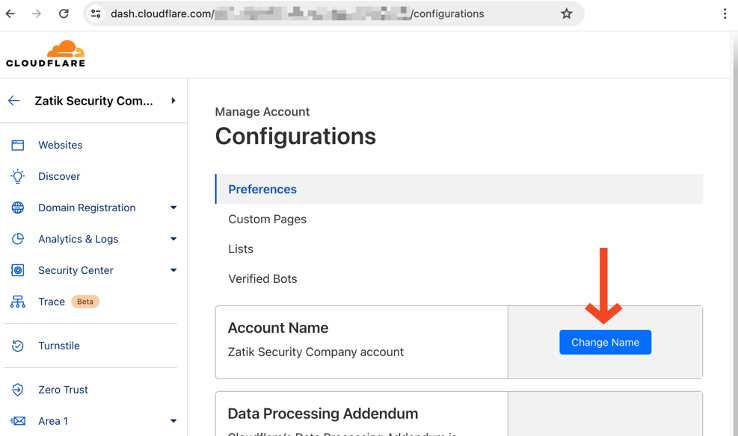
After creating the account, ensure to verify the email address on the account profile page you verify this email address. Finally, on the Configuration Page (https://dash.cloudflare.com/ACCOUNT_GUID/configurations) under Preferences, change the Account Name from “admin@example.com’s Account” to “ComanyName’s company Account”. Setting this value here will make it easier to work with child accounts when we introduce them later.
A note on the cloudflare console

In these instructions, we will link directly to pages in the Cloudflare console if we are able to where we can. However, some pages on the Cloudflare console must contain your account’s 32-character account GUID so we cannot link directly to them. In that case we will include the URL with ACCOUNT_GUID to make it clear. For example, the Cloudflare Configuration Page https://dash.cloudflare.com/ACCOUNT_GUID/configurations.
This account you are creating is the root of your company’s digital identity as it will control your domain names. You want to ensure that if something catastrophic happens you can recover it via Cloudflare’s account recovery process. Even if you are just using the free tier, on the Billing page (https://dash.cloudflare.com/ACCOUNT_GUID/billing) enter a payment instrument with an accurate billing address.
Once your account email and payment instrument is verified, on the Authentication Management profile page setup “Mobile App Authentication” app based second factor on this root account. Use Cloudflare’s documentation for this step. Once this second factor is setup, capture the recovery codes for this account in your password manager. These codes will allow anyone with access to them to log into the account. If you ever need to “break the glass” and access this account you will need access to these codes. Add these to your company’s disaster recovery documentation.
Account Recovery
When using SaaS platforms companies will not disclose the specific signals that they used to determine who owns an account if two parties claim ownership.
However, one common pattern is to look at the history of the account. If information has been changed recently this could indicate compromise of the account. If the company looks to the original address/payment instrument we want to set that as the legitimate owners.
Invite Child Accounts
We will now create the child accounts that employees will use for their day-to-day operations. On the Members page (https://dash.cloudflare.com/ACCOUNT_GUID/members) start by enabling the “Member 2FA enforcement” option. Since Cloudflare only supports app and hardware based 2FA, this setting ensures all child accounts that can access our account company account must have strong MFA enabled. A huge shout out to Cloudflare for offering this feature on their free tier, and making it so easy to enable!

Our child accounts will make use of Cloudflare’s Account-scoped roles. These control the permissions the account will have. Since we’re setting up an admin user we’re going to make use of the Super Administrator - All Privileges role. However, as you create other child accounts for users at your company consider what permissions a user needs to complete their tasks. The best way to limit the impact of a breach is for the user to not have the access to steal in the first place. Some useful roles to know about at the Billing and DNS roles. The former only can only edit billing information on the account, great to allow your finance people to manage an account without having any technical access to the account. The latter allows for the management of DNS records. This can be useful for web developers, or IT admins who might need to set these records, but do not need the ability to configure the Cloudflare account itself.
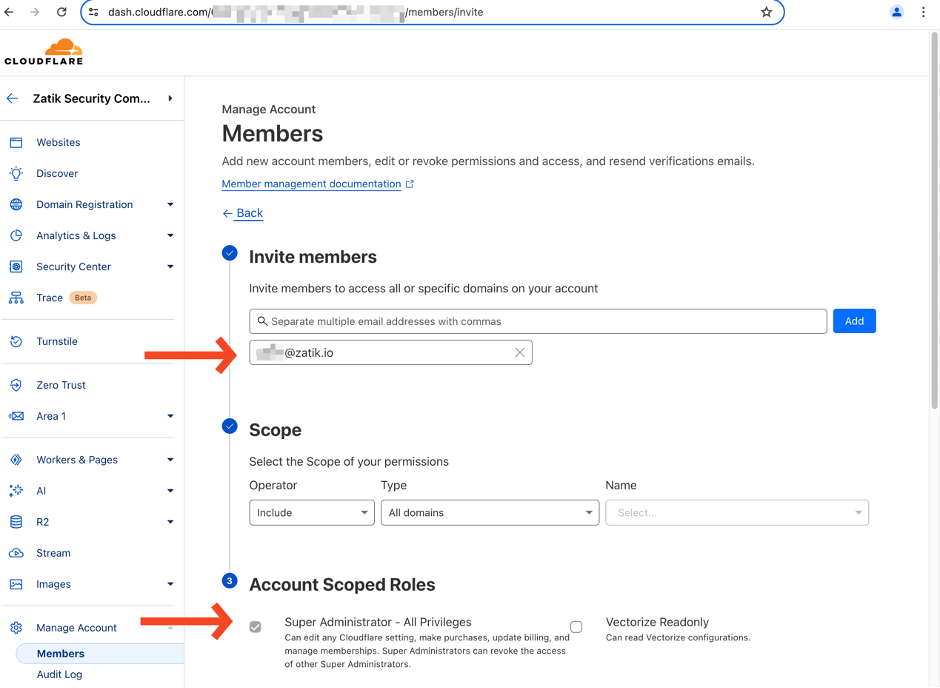
Use the blue “Invite” button to create a child accounts. Enter the email of the user who’s going to be in charge of your Cloudflare account. Set their “Scope” to include all domains, and select the Super Administrator - All Privileges role. Then click the “Continue to summary” button. Confirm that you have entered the correct info, then click “Invite”


With the invite sent out to child user with administrative privileges, log out of the admin account. Do not use this account again unless you are in a “break glass” scenario. Your child admin account has all the permissions in the parent account to serve as an admin account. If this child account is ever compromised the root account can be used to revoke their access and contain a breach.
Accept the invite with your individual email account. If you don’t already have a Cloudflare account, you will need to create one. When you accept the invite from the parent account, you will be required to add 2FA to the account. When you log into your child account make sure to select the Company Account from the list of accounts. With this structure in place you now have a functional Cloudflare account ready for your staff to operate out of.
Benefits of a Hardened Account Structure
Since your staff will have their own individual accounts, you can keep your root account locked down. The root is the ultimate control of your Cloudflare account, and if you find yourself with a compromised individual account you will be able to revoke their access using the root account. Other than this type of “break glass” scenario this account should never be used. Unfortunately, Cloudflare doesn’t support a native way to be notified if this account is ever used. However, they do have a robust audit trail so you can develop automation to detect any use of this account.
The combination of individual accounts, and Cloudflare’s audit log also allows you to know who is doing what in an account. This principal of non-repudiation is a key security component that you gain when employing this recommended account structure.
Scoped permissions also create boundaries of how large an issue can spread. If a contractor only has the ability to modify the DNS records for a single site, then they can only take down that one site by breaking it’s DNS records.
At Zatik we had to build this runbook for ourselves as we were setting up our DNS infrastructure since we couldn’t find a similar step-by-step, vendor neutral, free guide, so we’re sharing our research in line with our Company Values to pay it forward to the next founder.
Using the security features of the SaaS apps you’re already paying for can be confusing. Creation of company specific guides and strategies is one of the services we offer at Zatik Security. If you are building a business and need a team of experts to help you securely configure your assets, please get in touch.Step-by-Step Checklist for How to create a hardened Cloudflare account
Note: In these instructions we will link directly to the settings page if we are able to. However, some pages on the Cloudflare console must contain your account’s 32-character account GUID so we cannot link directly to them. In that case we will include the URL with ACCOUNT_GUID to make it clear.
If your company doesn’t already have one create a distribution list to be the root of all your SaaS products. Example admin@example.com
Create a Cloudflare account using admin@example.com. Generate a strong password and store it in your password manager
On the Account Profile page
Verify the email address
Opt out of all marketing emails
On the Authentication page add app based 2FA. Save the recovery codes to the vault entry in your password manager
On the Configuration Page (https://dash.cloudflare.com/ACCOUNT_GUID/configurations) under Preferences, change the Account Name from “admin@example.com’s Account” to “ComanyName’s company Account”.
On the Billing page (https://dash.cloudflare.com/ACCOUNT_GUID/billing) enter a payment instrument with an accurate billing address.
On the Members page (https://dash.cloudflare.com/ACCOUNT_GUID/members)
Enable the “Member 2FA enforcement” option
Click the blue “Invite” button and enter your email address. This child account will be used for day to day operations inside the Cloudflare console. Set the Scope to include all domains, and grant the user the Super Administrator - All Privileges Scoped Role
Once the invite has been sent out Log out of the Admin Account. You should never use this account for regular operations
Accept the invite with your individual email account. If you don’t already have a Cloudflare account, you will need to create one. Ensure that you setup 2FA on your account, you will need this when accepting the invitation to manage the parent account
When you log into the child account ensure that you select the company account from the list, vs your personal account.
At Zatik Security we assist our clients build security into their processes and tools. If you are trying to configure a tool and need a team of experts to help you, please get in touch.
None of the companies evaluated sponsored Zatik’s assessment or influenced our recommendations. These are our preferences, based on our research of publicly available feature documentation and professional experience as of March 2024. Gentlepersons can disagree, and your experience might be different.